Although screen shots of Outlook 2003 are included below, all versions of Outlook are quite similar. These instructions and screen shots should work with any version. Please note that you won’t be able to use these instructions until you have set up the required email account under the “Mail” section of your PageUP Productions Hosting Control Panel. If you don’t have an email set up, please do that first. Then continue by opening up Outlook and selecting the “Inbox”.
Configuring Your PageUP Productions Email Account in Outlook
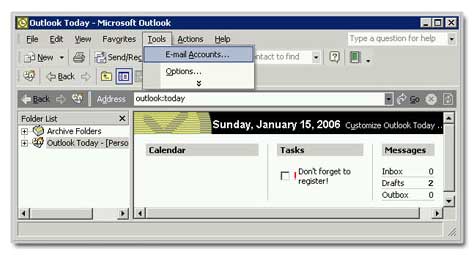
Now that Outlook 2003 has fully opened and you are looking at your inbox, select “E-mail Accounts” from the “Tools” drop down menu at the top of the screen:

In other versions of Outlook, the “E-mail Accounts” option of the Tools meu might simply be referred to as “Accounts”.
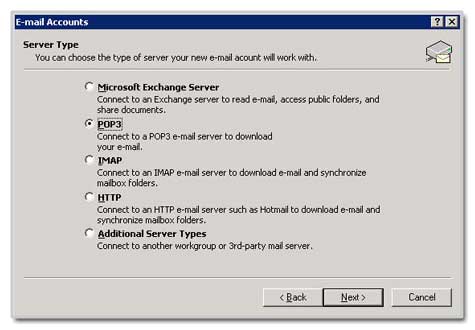
A new dialog window will appear, asking you what type of email account you wish to set up:

The choice is between POP3 and IMAP. What you choose will depend on how you wish to use your computer to access emails.
POP3 is a protocol that enables Outlook to access the email server and download all the emails to your computer. You can chose to either leave a copy of the emails you’ve downloaded on the server, or to delete them after a certain time period. Reasons to delete the emails from the server would include security and conserving your online storage space.
IMAP, on the other hand, is a protocol that allows you to leave and manage ALL of your emails on the server, both sent and received. For this tutorial, we will choose POP3.
Setting Up Your E-Mail Details in Outlook
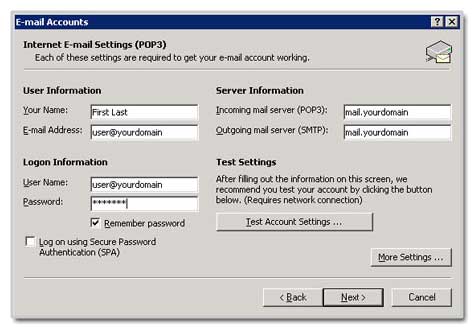
Having selected POP3, you will be presented with a new dialog window:

- User Information
- Your Name (First Last): should be the name you wish to appear as emails being received from in the respective column of any recipients email inbox.
- E-mail Address: should be the email you are setting up in full, and well formed.
- Server information
- Incoming mail server (POP3): should be “mail.yourdomain.com” where yourdomain.com refers to the domain name the email is associated with, for example pageuppro.com.
- Outgoing mail server (SMTP): should be the same as the incoming mail server.
- Logon Information
- User Name: needs to be the full and well formed email address “user@yourdomain”, for example makecontact@pageuppro.com
- Password: the correctly entered (case-sensitive) password you assigned in your Hosting Control Panel. If you wish not to have to enter the password every time you check your email, ensure that the “Remember Password” box is ticked.
- Change Port Setting for Outgoing Mail
- Click the the “More Settings” button and choose the “Advanced” tab of the dialog window. Change the SMTP port settings from the standard port 25, to port 26.
- Test Settings
- After filling out the information on the screen you can test your account by clicking on the button entitiled “Test Account Settings …” This will run through a series of tests for incoming and outgoing emails and will verify for you that the email account setup is working. If it returns an error, please read the error carefully and act accordingly. If the error indicates a problem with connecting to your incoming or outgoing mail, double-check the appropriate mail server settings.
Common Problems and How to Resolve Them
Username or Password Authentication Problems
Authentication errors can sometimes be caused in Outlook by it mishandling the “@” sign in the username. This can be corrected by switching the “@” for a “%” percent sign. If this doesn’t work, please double check that you have entered both the email address for the username and the password correctly.
Finishing Up and Getting Started Sending and Receiving Emails
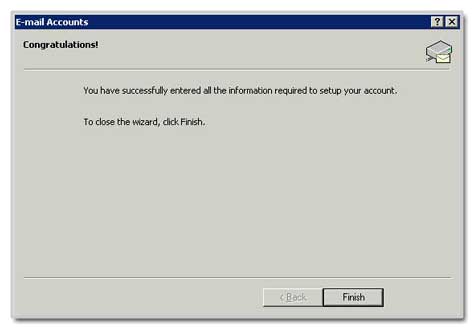
Assuming that everything has gone to plan, click “Next” and you will be presented with a screen telling you that the new email account has been successfully set up.

Close this by clicking “Finish”. You are now ready to send and receive emails using your own domain name.


